There’s nothing quite as satisfying as a perfectly carved turkey spread out on the table, and I’m here to share my secret with you. The How to Carve a Turkey Like a Pro Recipe simplifies what can feel intimidating, so you’ll impress everyone at the feast — and enjoy every juicy slice yourself!

Jump to:
Why You'll Love This Recipe
Learning to carve your turkey like a pro totally changes your holiday experience. Believe me, I used to dread the awkward slicing but now it’s one of my favorite kitchen moments. This recipe walks you through easy steps that bring confidence and beauty to the table.
- Simple, clear instructions: No confusing jargon or knife gymnast tricks, just straightforward carving tips anyone can follow.
- Saves time and stress: Knowing the right cuts makes serving fast so your turkey stays warm and juicy.
- Perfect presentation: Impress guests with neat slices and a stunning platter arrangement.
- Flexible for all turkeys: Whether it’s a Thanksgiving classic or a smaller dinner, these steps adapt beautifully.
Ingredients & Why They Work
Since this recipe focuses on carving, the star is clearly your roasted turkey. But don’t overlook the garnishes — they add that final professional touch and fresh contrast to the rich meat. Here’s what I recommend for the best results every time.

- Roasted turkey: Choose a well-cooked bird with crispy skin and juicy meat for easier carving and better flavor.
- Lemon slices: Brighten the platter with citrus notes that cut through the richness.
- Cranberries: Their tartness and color provide visual appeal and balance.
- Fresh herbs (like rosemary or thyme): They lift the presentation and add subtle aroma.
Make It Your Way
I love how forgiving this carving method is—you can adjust it to fit your style or turkey size. Maybe you prefer thicker slices or want to highlight the drumsticks first. Feel free to make it your own and enjoy the process!
- Variation: One year, I added a little sprinkle of smoked paprika right after carving for a subtle smoky kick that guests adored. You can experiment with spices or even brush a little herbed butter on slices before serving.
Step-by-Step: How I Make How to Carve a Turkey Like a Pro Recipe

Step 1: Remove the legs and thighs
Start by slicing the skin between the leg and breast carefully. Then, pull the leg outward and push up on the joint right under it—you might hear a satisfying pop. That’s the joint loosening up. Now, cut around it to remove the entire leg and thigh piece. Repeat on the other side and set them aside where the juices can rest.
Step 2: Carve out the breast meat
Slice down along either side of the breastbone with long, smooth strokes. When your knife hits the bottom, nudge the breast outward gently with your thumb, continuing to slice down and away until the entire breast comes off. If it feels tight, try slicing horizontally near the bottom to free it. Repeat this on the other breast, then set these aside.
Step 3: Take off the wings
Pull the wings away from the body gently and slice through the joint to remove them. I usually trim off the wing tips since there’s not much meat there. These go on the platter too, adding variety and flavor.
Step 4: Separate the drumstick from the thigh
Flip the leg piece skin side down and slice carefully through the meat. Pull back on the drumstick to expose the joint beneath and slice through. You’ll end up with two neat pieces—perfect for guests who love dark meat.
Step 5: Debone the thighs
Use your knife to cut around the thigh bone, making sure to keep as much meat intact as possible. This makes it easier for guests to take just the meat without fussing with bones.
Step 6: Final slices & presentation
Slice all the big pieces against the grain for tender, juicy bites. Keep the skin attached to every slice—that crispy skin is the best part! Arrange everything on a platter and garnish with your chosen accents like lemon, cranberries, and herbs for that wow factor.
Top Tip
After carving dozens of turkeys over the years, I’ve learned some tricks that make the whole How to Carve a Turkey Like a Pro Recipe way easier and more enjoyable. These tips will keep your turkey juicy, your knife work neat, and your guests impressed.
- Sharp Knife Matters: Using a sharp, sturdy carving knife with a narrow blade made all the difference for me — less tearing and more clean cuts.
- Don’t Rush: I know it’s tempting to hurry so the turkey stays hot, but slow, steady cuts help keep the skin intact and meat juicy.
- Let It Rest: After roasting, I always let my turkey rest for at least 20 minutes before carving — it locks in the moisture and makes cutting so much easier.
- Use the Joint Pop: Don’t be scared of that popping sound — it means the joint’s ready to separate cleanly, and it’s your carving green light!
How to Serve How to Carve a Turkey Like a Pro Recipe

Garnishes
I usually adorn my carved turkey platter with fresh lemon slices, sprigs of rosemary, and a handful of fresh cranberries. Not only do they make the presentation pop, but the citrus aroma wakes up your palate just before the first bite.
Side Dishes
My absolute favorites to pair with this turkey carving are creamy mashed potatoes, classic stuffing, roasted Brussels sprouts, and a tangy cranberry sauce. They all complement the tender meat perfectly and round out the comfort of the meal.
Creative Ways to Present
For special occasions, I like to lay out the carved turkey around a centerpiece of fresh herbs and add colorful fall leaves or edible flowers. Sometimes I place small ramekins of gravy and sauces on the side for an interactive feast everyone enjoys.
Make Ahead and Storage
Storing Leftovers
I store leftover carved turkey in airtight containers and place them in the fridge right away. It stays moist and tasty for up to 4 days, making tasty sandwiches and quick meals super easy.
Freezing
When I have more turkey than we can eat, I freeze the carved meat in portion-sized bags, removing as much air as possible. It freezes well and thaws overnight in the fridge without losing texture or flavor.
Reheating
I reheat the leftover turkey gently in the oven, covered with foil and at a low temperature (about 300°F) to preserve moisture. Adding a little broth or gravy during reheating keeps the meat juicy and delicious.
Frequently Asked Questions:
It’s best to let the turkey rest for about 20 minutes after roasting. This resting period allows the juices to redistribute, making the meat juicier and less likely to shred when carving.
Look for the natural crease where the leg connects to the body. Pulling the leg outward helps expose the joint — you’ll sometimes hear a subtle pop when the joint loosens, signaling it’s ready to be cut through cleanly.
Use a sharp carving knife and slice against the grain of the meat. Taking your time to make smooth, deliberate slices helps keep the skin attached and the pieces uniform — ideal for presentation and serving.
No, always ensure your turkey is fully cooked with an internal temperature of 165°F before carving. Carving an undercooked turkey is unsafe and can result in difficult-to-cut, chewy meat.
Final Thoughts
Honestly, mastering How to Carve a Turkey Like a Pro Recipe turned an intimidating holiday task into a moment I look forward to every year. Once you try these steps and see that beautifully arranged platter, you’ll feel like a kitchen rockstar — and your guests will notice, too. Don’t hesitate to give it a go; I swear it’s easier than it looks!
Print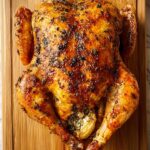
How to Carve a Turkey Like a Pro Recipe
- Prep Time: 20 minutes
- Cook Time: 0 minutes
- Total Time: 20 minutes
- Yield: 14 servings
- Category: Main Course
- Method: Stovetop
- Cuisine: American
Description
Learn how to carve a roasted turkey like a professional with easy step-by-step instructions. This guide helps you remove legs, breasts, wings, and thighs neatly to create a beautiful, photo-worthy Thanksgiving platter.
Ingredients
Main Ingredient
- 1 roasted turkey (about 14 pounds)
Garnishes
- lemon slices
- cranberries
- fresh herbs (such as rosemary, thyme, or sage)
Instructions
- Remove the legs and thighs: Slice through the skin between the leg and the breast. Pull back on the leg, lay it flat outward, and push up on the joint from underneath until you hear a pop. Cut around the joint with your knife and remove the leg and thigh completely. Repeat on the other side and set aside.
- Remove the breasts: Slice down on either side of the breast bone using long strokes. As your knife reaches the bottom, use your thumb to gently pull the breasts outward, continuing to slice down and out until the breast meat is removed. If needed, slice horizontally at the bottom of the breast from the outside to help remove it. Repeat on the other side and set aside.
- Remove the wings: Pull the wings gently away from the body and slice through the joint to remove each wing. Remove wing tips if desired and set wings aside.
- Separate the drumstick from the thigh: Flip each leg piece skin side down. Slice through the meat and gently pull back on the drumstick to expose the joint, then slice through it to separate the drumstick and thigh.
- Remove the bone from the thigh: Carefully slice around the thigh bone to separate it from the meat while preserving as much meat as possible.
- Carve the final pieces: Slice the meat against the grain to create tender pieces. Aim to keep the skin attached to each piece for better presentation and flavor.
- Arrange and garnish: Place all carved pieces neatly on a platter and decorate with lemon slices, cranberries, and fresh herbs as desired to create a stunning presentation.
Notes
- Practice makes perfect: carving becomes easier with experience.
- Use a sharp carving knife and a stable cutting board for safe, clean cuts.
- Keeping the skin attached to meat adds flavor and visual appeal.
- Remove wing tips as they contain little to no meat.
- Save bones for making flavorful stock or broth.
- Let the turkey rest before carving to keep juices locked in.
- Watch a carving video tutorial to build confidence.
Nutrition
- Serving Size: 1 serving
- Calories: 96 kcal
- Sugar: 1 g
- Sodium: 168 mg
- Fat: 10 g
- Saturated Fat: 6 g
- Unsaturated Fat: 4 g
- Trans Fat: 0 g
- Carbohydrates: 2 g
- Fiber: 1 g
- Protein: 1 g
- Cholesterol: 26 mg


Leave a Reply