There’s something truly irresistible about a rich, fudgy brownie — and with my Ultimate Gluten-Free Chocolate Brownies Recipe, you get all the chocolatey goodness without a hint of gluten. It’s the perfect treat to share or savor all by yourself, and honestly, it’s become a staple in my kitchen for good reason.

Jump to:
- Why You'll Love This Recipe
- Ingredients & Why They Work
- Make It Your Way
- Step-by-Step: How I Make Ultimate Gluten-Free Chocolate Brownies Recipe
- Top Tip
- How to Serve Ultimate Gluten-Free Chocolate Brownies Recipe
- Make Ahead and Storage
- Frequently Asked Questions:
- Final Thoughts
- Ultimate Gluten-Free Chocolate Brownies Recipe
Why You'll Love This Recipe
I’m genuinely excited to share this recipe because it nails texture, flavor, and that beloved glossy crackly top – all without gluten. You’ll love how versatile and forgiving it is, especially if you’ve struggled with gluten-free desserts in the past.
- Fudgy & Moist: These brownies come out deliciously dense and moist, never dry or crumbly like some gluten-free versions.
- Simple Ingredients: No need for weird flours—almond flour and cocoa powder create the perfect base that’s easy to find and use.
- Customizable: You can swap in nuts, different chocolate chips, or add a sprinkle of sea salt for that extra flavor layer.
- Gluten & Dairy-Free: Perfect for folks with dietary restrictions who don’t want to miss out on a classic indulgence.

Ingredients & Why They Work
Each ingredient in this Ultimate Gluten-Free Chocolate Brownies Recipe plays an important role to balance moisture, texture, and that deep chocolate flavor. Plus, they're straightforward enough so you can shop easily and even customize based on what you have on hand.

- Semi-sweet or dark chocolate chips: I like to use dairy-free chocolate chips here to keep it allergy-friendly, and melting them brings that rich, silky base for the batter.
- Coconut oil: Adds moisture and helps the brownies stay fudgy; it’s a healthier fat and gives a subtle, pleasant flavor.
- Coconut sugar: Adds sweetness and a slight caramel note, but you can swap in white or brown sugar if you prefer.
- Eggs: Important for structure and that chewy texture; be sure they’re beaten well for the perfect crackled top.
- Vanilla extract: Enhances all the chocolate flavors and gives a warm, inviting aroma.
- Blanched almond flour: This finely ground flour keeps the brownies tender and dense without any gritty texture that's common with some gluten-free mixes.
- Unsweetened cocoa powder: Boosts the deep chocolate flavor; I recommend Dutch-processed for a smoother taste but natural works too.
- Baking powder: Just a little to help with the texture, so it’s not too dense or heavy.
- Kosher salt: Balances the sweetness and enhances the chocolate intensity.
- Additional chocolate chips or chopped chocolate: These add melty pockets of chocolate that make each bite exciting; nuts work well too if you want a crunch.
Make It Your Way
I love playing around with this recipe. Sometimes I toss in chopped walnuts or pecans for a nice crunch, or sprinkle flaky sea salt on top just before baking for that sweet-salty pop. You can totally make this your own!
- Variation: Adding a teaspoon of espresso powder deepens the chocolate flavor and makes the brownies taste even richer — trust me, it’s a game changer.
- Swap the fat: Butter works beautifully if you aren’t avoiding dairy, and avocado oil is a great neutral option with a health boost.
- Mix-ins: Try dried cherries or a handful of white chocolate chips for a fun twist.
Step-by-Step: How I Make Ultimate Gluten-Free Chocolate Brownies Recipe
Step 1: Prep your workspace and pan
The first thing I do is preheat my oven to 350°F and line an 8x8-inch square metal baking pan with parchment paper. Spraying with nonstick spray helps the parchment stick and makes cleanup easier. This little prep step saves you from sticky fingers later — trust me, there’s always potential for spills!
Step 2: Melt chocolate and coconut oil gently
Next, I melt the chocolate chips and coconut oil together in a small saucepan over low heat. Stirring constantly keeps it smooth and glossy — don’t rush it or it might seize! Set it aside to cool slightly while you move to the eggs and sugar.
Step 3: Beat eggs and sugar to ribbon stage
This is a crucial step. Whisk the eggs and coconut sugar for 2-3 minutes until lighter in color and able to hold “ribbons” when you lift the whisk. I always use a hand mixer here to get it just right. This helps form that shiny, crackly top we all love — skipping this can lead to flat, dull brownies.
Step 4: Mix dry ingredients separately
While the eggs are beating, whisk together the almond flour, cocoa powder, baking powder, and salt in a separate bowl. This ensures even distribution before folding it into the wet ingredients.
Step 5: Combine chocolate with egg mixture
Pour your cooled melted chocolate mixture into the egg-sugar bowl and stir gently until smooth. Stir in the vanilla extract next. Be careful not to over-mix once you add the dry ingredients — fold them in just until no streaks remain for tender brownies.
Step 6: Add extra chocolate chips
Fold in most of the extra chocolate chips — reserve a few to sprinkle on top. Their melty pockets are what turn this from good to unforgettable.
Step 7: Bake and know when to stop
Pour the batter into your prepared pan and smooth it out. Sprinkle with reserved chips and bake for 18-20 minutes at 350°F. The edges should look set but the center still slightly underdone — this is key. I always poke the center with a toothpick and look for a few moist crumbs sticking; baking too long makes the brownies dry.
Step 8: Cool, garnish, and slice
Once out of the oven, I sprinkle flaky sea salt on top because I love that salty contrast. Let them cool completely on a wire rack — I sometimes chill them in the fridge for cleaner slices. Patience in this step really pays off.
Top Tip
Through making this recipe dozens of times, I’ve learned a few tricks that make or break these brownies. I’m passing these along so you get perfect results the very first time.
- Ribbon Stage for Eggs and Sugar: Don't skip or skim on this step. It might feel tedious, but this is what forms the crackly shiny top — a hallmark of great brownies.
- Don’t Overbake: Pull the brownies out when the center is still a bit underdone for that fudgy texture. They firm up as they cool.
- Use Parchment Paper: Lining your pan with parchment and letting it overhang the sides makes it easy to lift the whole batch out for cutting — less mess and neater squares.
- Flaky Sea Salt Garnish: Sprinkling a bit on top before cooling adds a wonderful flavor contrast and highlights the chocolate even more.
How to Serve Ultimate Gluten-Free Chocolate Brownies Recipe

Garnishes
I’m a big fan of topping these brownies with a pinch of flaky sea salt right after baking — it amps up the chocolate flavor and keeps the sweetness balanced. Sometimes I drizzle a bit of melted peanut butter or swirl in some raspberry jam for a fun upgrade. Fresh berries or a dusting of powdered sugar also make pretty garnishes for more elegant occasions.
Side Dishes
Serving these brownies alongside a scoop of dairy-free vanilla ice cream is my go-to for a decadent dessert. A simple cup of coffee or a glass of cold almond milk pairs beautifully too. For brunch or afternoon tea, I enjoy them with fresh fruit or homemade whipped cream to lighten the richness.
Creative Ways to Present
For parties, I like to cut the brownies into small bite-sized squares and arrange them on a platter with fun toppings like chopped toasted nuts or shredded coconut. Wrapping individual brownies in parchment paper makes great grab-and-go treats. At holiday times, I’ve even dipped the edges in melted chocolate or sprinkled edible gold dust for a festive look.
Make Ahead and Storage
Storing Leftovers
I usually keep leftover brownies in an airtight container at room temperature for up to 2 days—if you’re like me, they usually don’t last that long! If you want them to last longer, storing them in the refrigerator for 3-4 days works well to keep them fresh without drying out.
Freezing
These brownies freeze beautifully, and I often prep a double batch to have on hand. Just wrap individual pieces tightly in plastic wrap and pop them into a freezer-safe bag. They keep well for up to 2 months and thaw quickly at room temperature or in the fridge overnight.
Reheating
If you want that fresh-baked feel, I like to reheat brownies for 10-15 seconds in the microwave or a few minutes in a low oven (around 300°F). This softens them up and brings back some of that melty chocolate wonder without drying them out.
Frequently Asked Questions:
Absolutely! This recipe uses finely ground almond flour instead of wheat flour, making it safe for gluten-sensitive folks while still delivering rich, fudgy brownies. Just be sure all your chocolate is labeled gluten-free too.
I recommend sticking with finely ground almond flour for the best texture and flavor. Other flours like coconut or rice flour can change the moisture and density, and you might have to tweak the liquid ratios. If you must substitute, try a gluten-free baking blend designed for brownies.
The key is beating the eggs and sugar well until you see the 'ribbon stage'—when the batter falls back into the bowl in thick ribbons and has lightened in color. This creates the glossy crust that’s iconic for brownies. Don’t rush this step!
Yes! Use dairy-free chocolate chips and substitute the butter (if you choose to use it instead of coconut oil) with coconut oil or vegan butter. This recipe was designed to be dairy-friendly when you make these swaps.
Final Thoughts
I hope you give this Ultimate Gluten-Free Chocolate Brownies Recipe a try because it’s truly a gem in the world of gluten-free baking. I feel proud every time I make them—rich, fudgy, and so satisfying that no one ever guesses they're gluten-free. It’s like sharing a little slice of chocolate heaven with friends and family, and I’m sure you’ll love that feeling too.
Print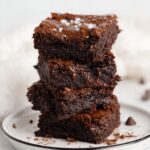
Ultimate Gluten-Free Chocolate Brownies Recipe
- Prep Time: 15 minutes
- Cook Time: 20 minutes
- Total Time: 35 minutes
- Yield: 16 brownies
- Category: Dessert
- Method: Baking
- Cuisine: American
- Diet: Gluten Free
Description
Deliciously fudgy and perfectly gluten-free brownies made with almond flour, dairy-free chocolate, and coconut sugar. These brownies have a glossy crackly top and a rich, melt-in-your-mouth texture that is sure to satisfy any chocolate craving while being suitable for gluten-free and dairy-free diets.
Ingredients
Main Ingredients
- ⅔ cup semi-sweet or dark chocolate chips (dairy-free if needed)
- 5 tablespoons coconut oil (can substitute butter, avocado oil, or vegan butter)
- ⅔ cup coconut sugar (can substitute white or brown sugar)
- 2 large eggs
- 1 teaspoon vanilla extract
Dry Ingredients
- ⅔ cup finely ground blanched almond flour
- 2 tablespoons unsweetened cocoa powder
- ½ teaspoon baking powder
- ¼ teaspoon kosher salt
Mix-Ins and Toppings
- ⅔ cup additional chocolate chips or chopped chocolate (can substitute nuts)
- Optional: flaky sea salt to sprinkle on top (like Maldon)
Instructions
- Preheat Oven & Prep The Pan: Preheat your oven to 350 degrees Fahrenheit. Line an 8x8 inch metal square pan with parchment paper or spray it with nonstick spray to prevent the brownies from sticking.
- Melt Chocolate: In a small saucepan, gently melt the chocolate chips with the coconut oil over low heat, stirring occasionally until the mixture is smooth and glossy. Remove from heat and let it cool slightly.
- Beat Eggs & Sugar: In a large bowl, whisk together the coconut sugar and eggs for 2 to 3 minutes until the mixture lightens in color and passes the ribbon test—meaning when you lift the whisk, the batter flows down in ribbons evenly. This step is key to achieving a glossy, crackly top on the brownies.
- Combine Dry Ingredients: In a separate medium bowl, whisk together the almond flour, unsweetened cocoa powder, baking powder, and kosher salt until evenly combined.
- Mix Wet and Dry Ingredients: Pour the melted chocolate mixture into the egg and sugar mixture, stirring until smooth. Stir in the vanilla extract. Fold in the dry ingredients gently until just combined to avoid overmixing.
- Add Mix-Ins: Fold in the additional chocolate chips or chopped chocolate, reserving a few to sprinkle on top of the batter before baking.
- Pour Batter & Bake: Pour the batter into the prepared pan and smooth the surface with a spatula. Sprinkle the reserved chocolate chips on top. Bake at 350 degrees Fahrenheit for 20 minutes or until the edges are set and the center is slightly underdone. A toothpick inserted should come out with a few moist crumbs.
- Garnish & Cool: If desired, sprinkle flaky sea salt over the warm brownies. Allow the brownies to cool completely on a wire rack before slicing. For the cleanest cuts, chill the brownies before slicing.
- Storage Tips: Store leftover brownies in an airtight container at room temperature for 1 to 2 days, in the refrigerator for 3 to 4 days, or freeze them for up to 2 months.
Notes
- Use finely ground blanched almond flour for the best texture and to avoid any graininess.
- If you want a dairy-free option, ensure your chocolate chips and butter substitutes are dairy-free as well.
- Experiment with mix-ins like chopped nuts or vegan chocolate to customize your brownies.
- Do not overbake the brownies to maintain a fudgy center; residual heat will continue cooking them after removal.
- Chilling the brownies before slicing helps achieve neat, clean slices.
- Use parchment paper with overhang for easy removal of the brownies from the pan.
Nutrition
- Serving Size: 1 square
- Calories: 176 kcal
- Sugar: 18.7 g
- Sodium: 90.7 mg
- Fat: 10.3 g
- Saturated Fat: 7.1 g
- Unsaturated Fat: 3.2 g
- Trans Fat: 0 g
- Carbohydrates: 20.5 g
- Fiber: 1.6 g
- Protein: 2.3 g
- Cholesterol: 23.3 mg


Leave a Reply